
Create New User
Super Admin permissions are required to create users.
Identify needed users and gather/identify basic information (names, email addresses, passwords), then complete the following steps to create new users:
- Click the Settings icon
 in the top-right corner of the screen. The Settings icon is a global button that displays in every module of the OPEN DISCOVERY platform.
 -
The System Manager opens. In the left pane of the System Manager, the Users tab opens by default.

-
Click the
 button at the top of the screen. The Create New User page appears.
Note: You also have the option to import users from a .CSV or .JSON file and to import users from an active directory. See Import Users from a File and Import Users from Active Directory for details.
-
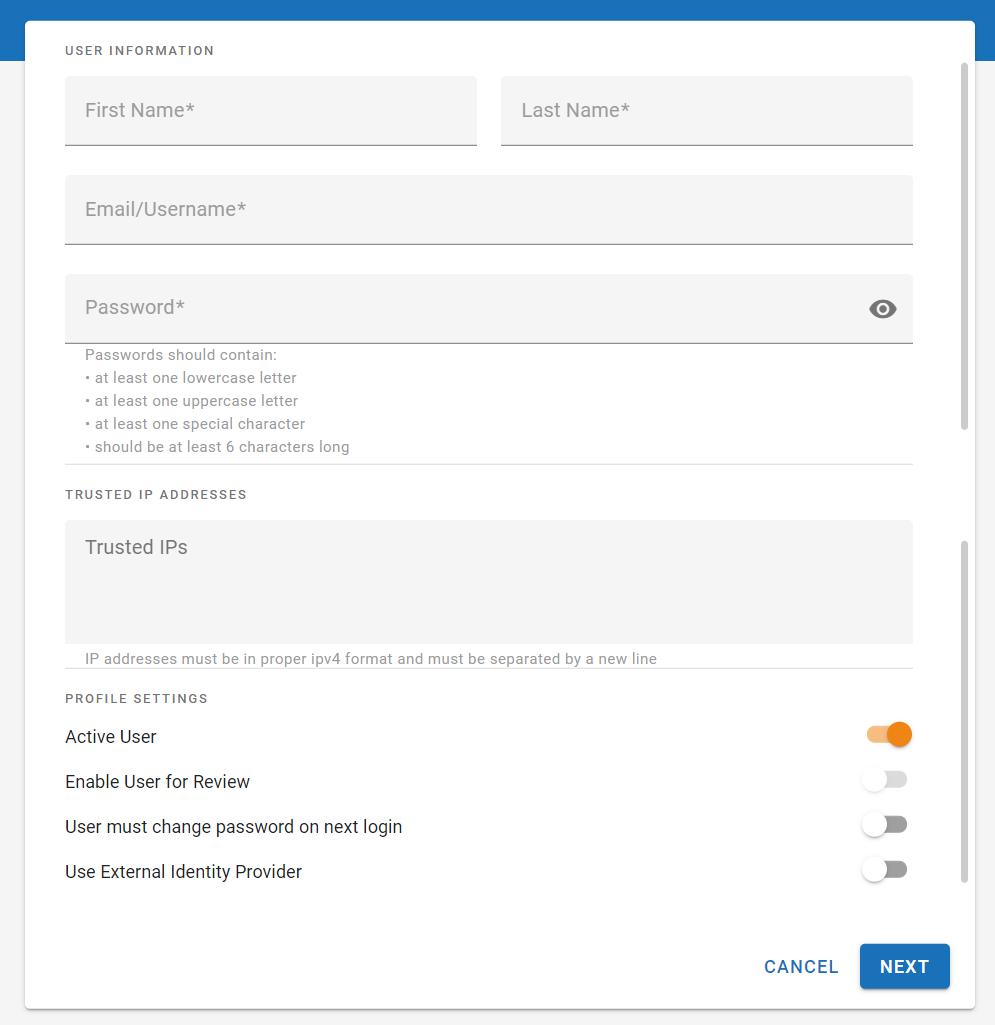
Enter all user details on the Setup User Details step (asterisks indicate required entries).

- User names must be email addresses.
- Passwords
must include at least:
- six characters,
- one uppercase and one lowercase character,
- one non-alphanumeric character.
- Optional: In the Trusted IPs field, enter one or more IP addresses the user is limited to. Enter one IP address per line. The IP address should be in the universal IPv4 format (e.g. 192.126.80.243). Each segment in the IP address should be less than 256 and equal to or greater than 0. If access is attempted outside of the listed IP address or IP addresses, an invalid login message prompt appears. If this field is left blank, no restrictions exist.
-
The ActiveUser option is selected by default. Otherwise, clear the option. If ActiveUser is cleared, the user cannot log in to OPEN DISCOVERY products. If the user is part of a group that has Self-Service and/or Media Manager Access, the System user setting overrides access to OPEN DISCOVERY and its components.
- The Enable User for Review option is cleared by default. Select this option to give the user access to OPEN DISCOVERY Review. The user must also have permissions to access cases in OPEN DISCOVERY Review.
- The User must change password on next login option is cleared by default. When this option is selected for a newly created user, the first time that user logs in, they will be presented with a login screen that contains two fields: New Password and Confirm Password. The user will enter a new password and confirm the new password upon logging in. This new password will be entered by the user for each subsequent log in.
-
The Use External Identity Provider option is cleared by default. Select this option to enable the user to log in to OPEN DISCOVERY using Single Sign-on (SSO). For a user to sign in with SSO, an external identity provider must be configured in the System Manager, and the user must have an account set up with the provider in question. For more information on how to configure SSO in OPEN DISCOVERY, see Configure Single Sign-on (SSO). When finished, click Next.
Note: When this option is selected, the user can no longer log in to OPEN DISCOVERY using their IPRO username and password.
-
Optional: On the Assign to Group step, users may be assigned to one or more previously created groups. The groups are sorted alphabetically. To search for a group, click the magnifying glass icon and begin to fill in the search field to return those groups that most closely match. To assign the new user to groups, select the needed groups from the list. Groups that have been selected are highlighted in blue.
Note: Users are not assigned permissions directly. Rather, permissions are set at the group level and filter down to the users assigned to them. Similarly, users cannot be assigned to cases directly. They must first be assigned to groups, and those groups assigned to cases. To learn more about users and groups, see Manage Users and Groups.
- When details are completed, click Save.
-
Repeat this procedure for all OPEN DISCOVERY users.
- Inform users of the OPEN DISCOVERY URL, their login credentials, and their responsibilities.
Related Topics